 There are plenty of tape emulation plugins out there. So how do you choose? For me it's most important that it sound great. And the new Magnetite plug-in from Black Rooster Audio's got it where it counts. Magnetite is an easy-to-use tape emulation inspired by the sought-after Studer tape machine. Choose from three different types of tape, tape speed, analog noise on or off, and even add a little wow and flutter if you like. Here's what I love about it. It just sounds great Every Black Rooster Audio plug-in I've ever used is superb quality - it's one of the things they're really known for. And Magnetite is no exception. Personally, I love the black tape setting at 7.5 ips. It adds just the right amount of grit that makes the snare pop. But I also found the red and blue settings bring out some of the body and ring - both in slightly different ways - which may be the sound you're looking for. I also like a little tape saturation on my master buss and found the red setting at 15 ips seems to be my favorite so far. It's just the right amount of that warm, retro tape sound. It's super easy to use You really can't go wrong with Magnetite. The default settings sound great without any tweaking. But here's how I like to set it up. I loop the loudest part of my track, then set the left meter to input and leave the right meter at the default, output setting. That way I can monitor how much I'm driving the tape sound on the left, and make sure I'm not getting too loud on the output with the right meter.  Pro tip: you can right click as you adjust the input knob and it will automatically compensate the output knob when you want to add tape drive without adding volume (see below). Nice! Then I just turn the input up until I'm hearing the right amount of saturation for the track. 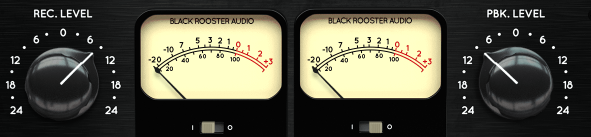
Streamlined I've seen tape emulations that think more buttons and knobs are better. They're not. I appreciate that Magnetite focuses strictly on being a great sounding tape emulation - pick your type of tape, speed, analog noise and you're done. If you're looking for a special effect (other than the cool, super saturation sound) you can add a little wow and flutter that simulates the sound of a tape machine not working properly. It's cool if that's the effect you're going for. And if Magnetite isn't already streamlined enough for you, you can even collapse the tape-reel graphic so all you're looking at is the control panel. Just click the Magnetite label beneath the meters. So far I've used it primarily on snare drum, vocals and my mix buss. I'm pretty happy with it. Try it out and let me know what you think. 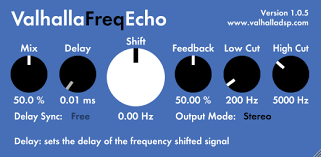 I love free plug-ins as much as you do. Probably even more. And I've certainly downloaded more than my fair share of them. But like anything done in excess, loading up on free plug-ins can be unhealthy and counter productive if you don't have some purpose and discipline to go with it. Here are a few things you should consider before you grab the next freebie that comes your way. Talk to your doctor about Plug-in Acquisition Syndrome Free plug-ins make it easy to just grab a new plug-in whenever you want. Sure, I know I don't need another compressor, but this one might add the perfect character to this vocal track I'm working on. And why not, right? It's free! But if you're getting free plug-ins that do something you can already do in your DAW, or that you don't even need, you may just be creating a bad habit of obtaining new plug-ins. Let's call it Plug-in Acquisition Syndrome, or PAS. And trust me, eventually "why not, it's free" turns into "why not, it's on sale". Ask your doctor if once-a-day Plugitor is right for you. Too many plug-ins can mess up your workflow For most of us DIYers, one or two of each kind of plug-in is enough. In fact, having fewer choices is often an advantage because you can really get to know how each of them work and learn to make the most of them. When you have too many plug-ins - a problem greatly enhanced by the millions of free plug-ins out there today - you often get bogged down by the long process of deciding which one to use. Then you try several options on a track and start losing your objectivity spending an hour on something that sounds worse now than when you started. So if you're recovering from PAS like me and have acquired several plug-ins over the years, try this: if your DAW will let you, create a separate folder inside your plug-in manager called "favorites" or something like that. Then pick one favorite of each type of plug-in and mix a song using only the ones you put in that folder. You may find you're more focused on the mix and less caught up in picking plug-ins. And it will probably sound better! 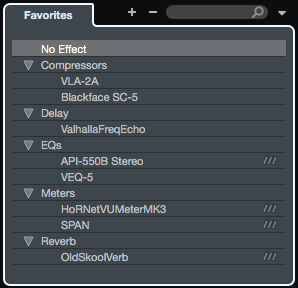 Practice your skills before you look for new tools
If you're just starting out, the difference between the stock plug-ins in your DAW and the third-party, "better" versions isn't significant. But free third-party plug-ins can be very tempting for the budget-minded beginner who thinks new plug-ins are the key to sounding more professional. That line of thinking is a slippery slope down the path to PAS. So if you're not happy with the way your mixes sound, don't reach for a new plug-in yet. Practice the skills needed to make your mixes sound better first. Once you've honed your skills, new plug-ins might be able to make good mixes sound better, but they can never make bad mixes sound good. Don't try to fill a skill gap with a new plug-in. If in doubt, ask your doctor if you're healthy enough for free plug-ins. Free plug-ins can be such a tease A lot of free plug-ins are really good. For example, Valhalla Freq Echo is amazing, a ton of fun and free! But when I picked it up I wasn't looking for a delay plug-in, I was [hanging my head in shame and avoiding eye contact] just looking for free plug-ins. So what happened? Well, now I'm looking at Valhalla VintageVerb. To recap: I wasn't looking for a delay plug-in but now I'm about to pay for a reverb I wasn't looking for either? I got sucked in! Hold on while I pop another Plugitor. So what do I recommend? The whole point of this article is that most of us with modern DAWs probably already have all the plug-ins we need to make great sounding recordings. So when we look for new plug-ins, free or paid, we should be deliberate about it. Look for the ones that do something you actually need and can't do already. Or wait until you've developed your skills to the point that it's actually the plug-ins that will make your mixes better - and not a skill gap. If you're struggling - like maybe you clicked that Valhalla link above and now you want to buy VintageVerb - I won't judge you. But just remember the symptoms of PAS and ask your doctor if Plugitor is right for you. 3 reasons I like analog emulation plug-ins (better than whatever the other kinds are called)6/22/2017  I started recording during a time when the Alesis ADAT was the standard in the studio. It was digital, but it wasn't a computer. Pro Tools was around but it was pretty new and few studios in my area used it much. EQs, compressors, delay, reverb - it was all hardware. So maybe that's one of the reasons I prefer analog emulation plug-ins over the more modern-looking, non-analog emulation ones. But besides just being old fashioned, here are three more reasons: 1. Listen with your ears, not your eyes! Have you ever noticed that closing your eyes while listening to something helps you listen better? A non-analog emulation EQ with a spectral analyzer, or a compressor with a graph showing you the input/output curve might be cool - even handy - but it's probably making you focus on what you're seeing more than what you're hearing. And no matter how cool it looks, no one will see any of this when they listen to your song. It matters what they hear, and that’s what you should be focused on. 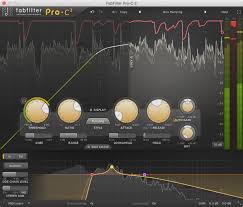 Lots of stuff to look at here. Are you listening? 2. Limited options get quicker results I have one of those modern-looking EQs with eight fully selectable bands and literally 20,000 possible frequencies to boost or cut. Sure, sometimes it's useful to notch out 987Hz when I need to do some surgical editing, but generally speaking, 1k is going to do the trick. So the first two EQ plugins I tend to reach for are the Waves API 550 and the Black Rooster Audio VEQ-5 because the hardware they're modeled after have a limited selection of the tried and true frequencies that have been getting the pros results for decades. That way, I can choose from a limited amount of options and get something that sounds good, fast. 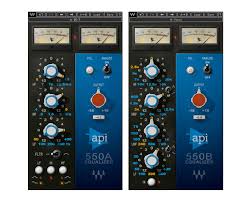 3. Analog adds "sum" character All the music most of us grew up listening to was recording with analog gear. And every step of the process in those recordings - the microphone pre, mix console, effects, compressors, the tape it was recorded on - literally everything, added a little bit of unique character. All of that unique character added together created something that, when removed, made the music seem sterile or a little lifeless. Like it's missing a little bit of that sound we're all used to hearing. It's called analog summing. Most plug-ins modeled after analog gear attempt to add some of the unique harmonic distortion the original gear added to the music and put back some of that character that's missing in digital. In fact, there are even plug-ins designed to do nothing but that, like Waves Non-Linear Summer. It's a plug in that adds the unique analog sound of three legendary mixing consoles. 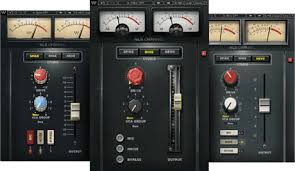 So the next time you need an EQ, compressor, or anything, try an analog emulation and see what you think. Tell me how it goes!
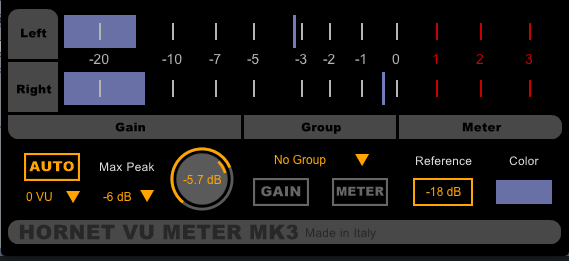 Let's be honest. If you know what gain staging is, you either do it because you know its benefits or you skip it because you know how tedious it is. But absolutely nobody does it because it's fun. But now, even if you don't know what gain staging is, the HoRNet VU Meter MK3 plugin let's you reap it's benefits without the hassle. With a price at just around $5, you don't have any excuses not to gain stage before every mix. Here’s how it’s made the once-agonizing process a breeze and helped me make better mixes. Why do I gain stage? Before I start a mix, I import my tracks into my mix template and set the pre-fader trim so that each one is around -18 dBFS. Why -18? There are a lot of reasons why this is most people's magic number, but without boring you with the details, it's basically the digital standard calibrated with most A/D converters. But more importantly setting all my levels to around -18 gives me plenty of headroom so my mixes have plenty of room to move without clipping. Before I even touch a fader, all of my tracks are coming into my signal path at about the same volume. That's a great way to start a mix, especially if you're mixing tracks someone else recorded pretty hot. How has the HoRNet VU Meter MK3 change my life? The first and obvious way is that I used to have to gain stage manually. I'd go through, track by track with a VU meter and level everything out the best I could. And I must confess, it's often the reason I'd skip gain staging and just dive right into mixing. But now with the HoRNet VU Meter MK3's auto feature, I put it on the first insert of each track, set it to the level I want to gain stage to, click the auto button and let it play. The plugin automatically turns the gain up or down so the average db is at the target I set. Pro tip: once the HoRNet VU Meter MK3 tells you how much it's adjusted the gain, just turn your pre-fader trim up or down that much and remove the plugin. That way you can have that insert slot back! HoRNet VU Meter MK3 helps me reap the benefits of gain staging - every time! Once all my tracks are gain staged, I get all the benefits without the hassle. Here are my two favorite benefits: 1. Most analog emulations are optimized to -18 dBFS. Ever notice a little screw on Waves analog emulation plugins? Hover your mouse over it and the number "18" appears. This let's you calibrate the plugin to outboard gear or meters. Waves defaults to -18 (many other's probably do too) so it's reasonable to assume that's the level they used when creating all their presets. While presets are never full proof, gain staging has at least helped me use them as an even closer starting point. 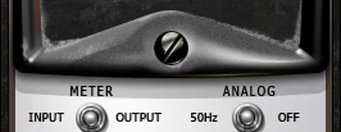 Many Waves plugins have a screw that can calibrate the VU level. 2. I spend less time fiddling with plugin settings. Once I've gain staged a few mixes and dialed in the perfect settings on my plugins, it's much more likely those settings will work on the next mix I use because both mixes are starting at -18 dBFS. Or at least they're much closer so I can dial them in faster. I find this most useful for setting the threshold on a compressor. I've just tweaked the compressor on my snare drum and saved my settings. Chances are, on my next mix, those settings will be much closer to the mark since both were dialed in at the same levels. Less fiddling means more mixing! So there you have it. Give the HoRNet VU MK3 a try and let me know how it changes your life. 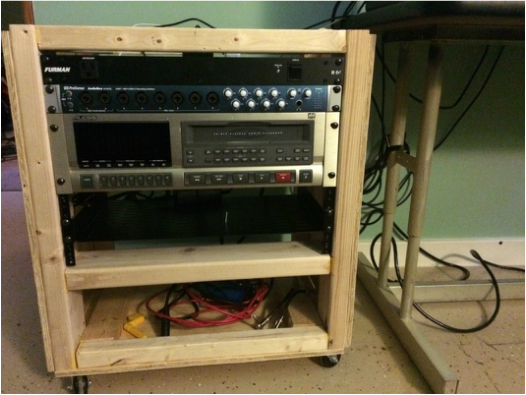 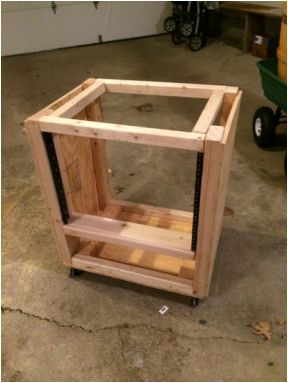 Here’s how I built the scrap-wood studio rack. I wrote this from memory so I hope I got it all right!
THE FRONT FRAME I cut two 2x4s to 24 inches each. Then I attached the rack rails (I used these rails). I used three-quarter inch wood screws in every third hole. Be sure to leave about two inches at the top of the 2x4s for a cross bar. Then I installed an ADAT (you can use any piece of gear) in the middle of the rack rails to be sure they were the proper distance apart and so they wouldn’t shift while I was installing cross bars. I cut a 2x2, a 2x4 and a 2x3 to 19 inches to create three cross bars along the front. With the ADAT still in the rails and balanced on the corner of my work bench with the 2x4s hanging down on both sides, I used 1.25 inch construction screws (I’d highly recommend drilling starter holes first) to install the 2x2 at the top, the 2x4 in the middle just below the rack rails, and the 2x3 on the bottom. All of these should be flush with the front of the 2x4s. I took the ADAT out of the rack rails now that the front frame is complete. THE BACK FRAME I cut two 2x3s to 24 inches each (because I ran out of 2x4s). Then I attached 19 inch 2x2 cross bars to the bottom and top of them to create a back frame. The cross bars should be flush with the backs of these. CONNECT FRONT TO BACK I used 13.5 inch 2x2s on each side of the top to connect the back frame to the front frame. Then I used 13.5 inch 2x3s on the bottom. Again … just working with the scrap wood I had at the time. THE BASE AND SIDES I cut plywood to the size of the base and secured it with 3-quarter inch wood screws. I left room in the corners for caster wheels. Then I cut plywood to the size of each side and secured them with 3-quarter inch wood screws. The sides also helped with stability. Then I installed two-inch caster wheels on the bottom. I used these linked here. I chose to leave the top open so it would be easy to rewire things quickly if I needed to. I plan to build a desk that I could roll this under and no one will see the open top anyway. But if you wanted you could cut plywood to create a top. |
