  Here’s how I built the scrap-wood studio rack. I wrote this from memory so I hope I got it all right!
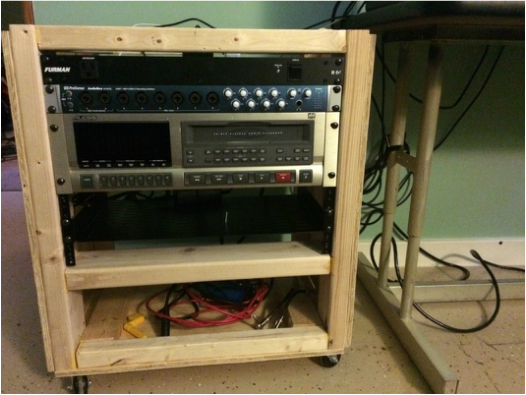
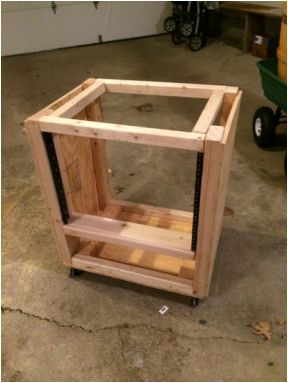
THE FRONT FRAME I cut two 2x4s to 24 inches each. Then I attached the rack rails (I used these rails). I used three-quarter inch wood screws in every third hole. Be sure to leave about two inches at the top of the 2x4s for a cross bar. Then I installed an ADAT (you can use any piece of gear) in the middle of the rack rails to be sure they were the proper distance apart and so they wouldn’t shift while I was installing cross bars. I cut a 2x2, a 2x4 and a 2x3 to 19 inches to create three cross bars along the front. With the ADAT still in the rails and balanced on the corner of my work bench with the 2x4s hanging down on both sides, I used 1.25 inch construction screws (I’d highly recommend drilling starter holes first) to install the 2x2 at the top, the 2x4 in the middle just below the rack rails, and the 2x3 on the bottom. All of these should be flush with the front of the 2x4s. I took the ADAT out of the rack rails now that the front frame is complete. THE BACK FRAME I cut two 2x3s to 24 inches each (because I ran out of 2x4s). Then I attached 19 inch 2x2 cross bars to the bottom and top of them to create a back frame. The cross bars should be flush with the backs of these. CONNECT FRONT TO BACK I used 13.5 inch 2x2s on each side of the top to connect the back frame to the front frame. Then I used 13.5 inch 2x3s on the bottom. Again … just working with the scrap wood I had at the time. THE BASE AND SIDES I cut plywood to the size of the base and secured it with 3-quarter inch wood screws. I left room in the corners for caster wheels. Then I cut plywood to the size of each side and secured them with 3-quarter inch wood screws. The sides also helped with stability. Then I installed two-inch caster wheels on the bottom. I used these linked here. I chose to leave the top open so it would be easy to rewire things quickly if I needed to. I plan to build a desk that I could roll this under and no one will see the open top anyway. But if you wanted you could cut plywood to create a top. |
